Saturday, April 9, 2016

Giant Cup cake Readers Showcase

We asked our readers to create Giant Cupcakes… with a difference. We were looking for cake decorators to think outside of the box, and come up with some designs that move away from the traditional Giant Cupcake. Here, you will find no simple sugarpaste or chocolate cupcake bases with piped buttercream on top. Instead, we are sharing the cupcakes that really impressed us with the ingenuity and creativity of their design. Here are some of our favourites… 


Anna Mathew Vadayatt
Cake Canvas – happiness in a box
“Anna was a Cake Masters Magazine Modelling Excellence Finalist for the 2015 Awards, and you can totally see why with this beautiful Manipuri dancing girl giant cupcake. There is a stunning attention to detail on the model, who is poised and graceful, and on the base that makes up the girl’s flaring skirt, with those tiny dots of royal icing.” 


Ashwini Sarabhai
The Dream Cakes
“This rustic giant cupcake is a lovely, subtle twist on the traditional. The texture of the base and the unusual placement of flowers at an angle caught our eye. It is a pretty and delicate design, with a soft addition of colour from the flowers.”


Danielle Lechuga
Cup’N Cake
“With lots of elements that come together as one gorgeous creation, we love so many things about this giant cupcake. The marbled effect on the fondant top, the dripping ganache on the cake and the cute modelled girl on top are all great. Little tricks like the continuity of the wafer style board with the wafer treats on the side with the lollies and macarons, really bring the design together. It’s fabulous


Linda Caro
Little Hunnys Cakery
“Inspired by her love of pasta, Linda has transformed her giant cupcake into a pot of spaghetti and meatballs. We particularly like the metallic silver achieved on the base, the spaghetti detail and the grated fondant on top that looks like cheese! It’s a very creative design.”


Marina Danovska
“This giant cupcake is the diamond…
coming out the rock! We love how completely different this is. A great transformation that makes you think of the extraordinary within the ordinary.”


Loes Jakobs
LoveLicious Cakes
“Giant cupcake turned giant mug of hot chocolate and whipped cream! The pink and brown theme works really well. We love how it is an actual mug and looks good enough to dig a spoon into and start drinking.”


Jana Hrubá
Jajiny Dortiky
“This comical creation is definitely out of the box. We love the dress up theme, with the cupcake base unsure of which hat to put on and all of the different choices. It’s quirky and whimsical.”


Niqua Wheatley
Niqua’s Baking Addiction
“We love this design because of how beautifully disguised the giant cupcake is inside the ice cream! The wafer cone base has a great texture and the additional detail of the board is a nice touch. It looks delicious.”


Joyce Marcellus
Toxic Sweets Shop
“We love the drama of this cake! The top of the cupcake has a beautiful bas-relief golden design and the pinned brooch and feather detail creates a lovely finish. With its vintage flapper style, it’s a brilliantly opulent hat on a stand and a great twist on the giant cupcake.”


Nisha Fernando
Sweet Delights Cakery
“A magical fairy house nestled in an enchanted forest in the middle of a mystic pond, this giant cupcake truly transports you to another world! Every time you look at this exquisite cake, you see more intricate details that add to how impressed you are: the texture of each roof tile, the balancing of the house on the rock tower, the shining green board that creates the effect of the pond, the delicate touches of the moss and the door detail… the list just goes on!”


Tennille Russo
The Chantilly Kitchen
“Dreamy and magical, this giant cupcake is like a work of cosmic art. The painted work is charming and the hanging stars add a lovely touch. We love the beautiful deep colours of the nebula. Simple but really captivating!”


Raquel Ribeiro
Toque d’Açúcar
“Totally different from the rest of the giant cupcakes submitted, this hanging, steampunk take of a cuckoo clock is fabulous! We love the tonal colours of the clock and the little bird, plus the detailing on the wood and metal-effect cupcake top. It is a great interpretation of the steampunk look.”


Sofia Salvador
Mnhammy
“It’s lovely to see the same texture over the whole giant cupcake, and the more complex woollen texture of the cupcake base. It’s a really pretty knitted design and the little boots are so cute!”

Vintage Frame Cupcakes Tutorial By Nina Evans Williams, Môn Cottage Cupcakes

Nina, from Môn Cottage Cupcakes, is an award-winning cake artist from Wales, UK. She is known for her beautiful painted cakes and also teaches private classes from home. In this tutorial, Nina shows you how simple it is to create two different types of pretty cupcakes

Equipment Required

PME Pearl edible lustre spray
• Clear alcohol/vodka
• Edible glue
• Blossom cutters (3 different sizes)
• Petunia veiner (Blossom Sugar Art)
• Round cutter (7cm)
• Various frame moulds
• 2 brushes (painting and for glue)
• Kitchen roll
• Cornflour duster
• Paint palette
• Rolling pin
• Work board
• White sugarpaste with gum tragacanth (Tylose) already added
• Pink sugarpaste
• Brown sugarpaste
• Rainbow Dust ProGel Colours: Leaf Green, Yellow, Poppy Red, Pink and Baby Blue
• Yellow dragees
• Edible pens: pink and black
• Gold edible dust
• Veining tool

Cherry Blossom Cupcakes
Step 1.
Roll out sugarpaste to about 3mm thick and mark with lines using the veining tool. Start making oval marks with the veining tool to make it look like knots in wood.

Step 2.
Carry on marking with lines using the veining tool so that you have a wood effect.

Step 3.
Cover all the area of sugarpaste with lines. 


Step 4.
Cut out round discs using the round cutter and leave to dry.

Step 5.
Dab a tiny amount of blue ProGel into the paint palette and mix with a tiny amount of vodka to create a wash. Paint the disc and you will see that the colour will ingrain into the wood effect and make it more authentic.

Step 6.
Making sure you have covered the disc in paint, leave it to dry.

Steps 7a & b.
Choose your frame mould, I chose the square frame mould. Dab a bit of cornflour into it. This helps to remove the frame later on with ease. Tap the excess cornflour out. 


Steps 8a & b.
Using your finger, squeeze the white sugarpaste into the frame mould making sure that there is no sugarpaste sticking out of the frame. The frame should pop out easily for you. Leave to dry.

Step 9.
Mix some gold dust with a little bit of alcohol. Paint the gold onto the frame and leave to dry, you should find that one coat should be enough.

Steps 10a-d.
Roll out some pink sugarpaste to about 1mm thickness. Using the various sizes of blossom cutter, start cutting them out. Using the petunia veiner, place the cut blossom in the middle making sure that it fits into the veiner correctly, not at an angle. Pull the top of the veiner down gently (this is the bit that sticks out) without squeezing too much and you should be left with a pretty flower. Do the same with all the sizes of flowers. 


Steps 11a & b.
Using the pink edible pen, mark lines from the middles of the flowers out as seen in the photo. Add a tiny dab of glue to the centres of the flowers and add some yellow dragees. You won’t need many for each flower

Step 12.
After the gold frames have dried, dab underneath with a bit of glue and stick them to the wooden effect topper.

Steps 13a & b.
Roll out the brown sugarpaste into tiny thin sausages. Twist the little sausages to give them a little kink to look like cherry blossom twigs. 


Steps 14a-c.
Dab a tiny amount of glue to the corner of the frame and stick the twigs onto it. Stick the different blossoms on randomly. As you can see, I used one large flower, two medium and three small.

Painted Cupcakes
Step 15.
Roll out sugarpaste to about 3mm thickness and cut out circles using the round cutter. Leave to dry.

Step 16.
Add a tiny bit of pink, green, yellow and red ProGels into different parts of the palette. Add a little bit of alcohol to each and mix.

Steps 17a–c.
Randomly paint dots of pink to the disc. If there is too much alcohol, rub off excess onto kitchen roll and add a tiny bit more gel colour. Paint the rest of the discs red and yellow and add the leaves in green. Leave to dry. 


Step 18.
To add a bit of contrast, add black detail to the flowers and leaves using a black edible pen.

Step 19.
Add some more leaves with the black pen.

Step 20.
Make frames in white and spray with PME Pearl Edible Lustre Spray. Place it onto the dry painted design where it looks best and glue into place.

Pipe your cupcakes as usual using buttercream, I wanted them flat so I piped the rose effect. Gently place the toppers on top of the buttercream.

Giant Cupcake Tutorial By Lori Ann Hynes, Lori’s Sweet Cakes

Based in Alberta, Canada, Lori made her first cake five years ago. She is self-taught in that she has never attended a class, but has learned from some amazing cake designers through social media. Lori built a licensed kitchen in the basement of her home in 2012, but as her husband is a Royal Canadian Mounted Police Officer, her family move every 3-5 years. In October 2015, Lori’s family was transferred, so she has taken time away from the busy business to focus on helping their two children adjust to the move. She continues to make cakes and other sweet treats to celebrate birthdays and special events with the people who are closest to her, and plans for a new kitchen have started! Lori loves sculpting characters and cakes with texture

Equipment Required

• 2 - 2”x6” cakes
• 1 - 6” half sphere cake
• Buttercream
• Fondant
• Royal icing
• Dragees
• Sixlets
• 8” round cake drum
• 4” cake card
• 6” cake card
• Palette knife
• Bench scraper
• Serrated knife
• Rolling pin
Fondant smoother
• Craft knife
• Ruler
• Modelling stick
• Bubble tea straws
• Scissors
• Ball tool
• Small paintbrush
• Gel paste food colours: Brown, Lemon Yellow, Soft Pink and Leaf Green

Step 1.
Cover an 8” cake drum with pink fondant. Use a smoother to smooth the fondant and a craft knife to cut excess fondant from the edge of the cake drum. I like to add ribbon around the edge after my cake is complete.

Step 2.
Cut both 2”x6” round cakes into 1” layers. Fill and stack three layers and set aside the remaining layer

Step 3.
Place a 4” cake card on top of your filled and stacked cake. Use a serrated knife to carve your cake at a downward angle, starting from the edge of the 4” cake card and finishing at the edge of your 6” bottom layer. Be sure to leave the bottom layer at 6”. I like to chill my cakes for a few minutes after carving. 


Step 4.
Use a palette knife to cover your chilled cake with buttercream. Once you have covered your cake, use a bench scraper to smooth the buttercream and create clean edges.

Steps 5a-c.
Roll out green fondant and cover your cake. I added a small amount of yellow gel paste to the green to achieve this colour. Once you have your cake covered, smooth it out with a fondant smoother and use a craft knife to cut away excess fondant

Steps 6a & b.
While your fondant is still soft, use a ruler to measure vertical lines that are 1” apart. Gently press a modelling stick into your fondant using the length of the ruler as a guide.

Steps 7a & b.
Flip your cake so that it is resting on the tapered 4” end. Place your cake in the centre of your 8” covered cake drum. Your cupcake bottom is complete. Insert three bubble tea straws into your cake, cutting them with scissors or a craft knife. The straws will support the top of your cupcake


Steps 8a-c.
Fill and stack the remaining 1”x6” round cake and half cake sphere. Place it on the 6” round cake card. Use a palette knife to cover your cake with buttercream. Cover with a thin layer of white fondant, then place on top of your cupcake bottom

Steps 9a-c.
Role a 36” long rope from white fondant. Use a small paintbrush to apply a thin layer of water to the top of the cupcake. The water will hold the fondant rope in place. Be careful not to use too much or the rope will slide rather than stay in place. Swirl your fondant rope around the top of the cake. Press gently to be sure it stays in place. 


Steps 10a & b.
Roll a layer of white fondant to cover the top of your cupcake. Use your fingers to gently smooth your fondant around the rope.

Steps 11a & b.
To create the dripping icing, roll small fondant balls and use your fingers to roll each ball into a teardrop shape. Attach with water 


Steps 12a & b.
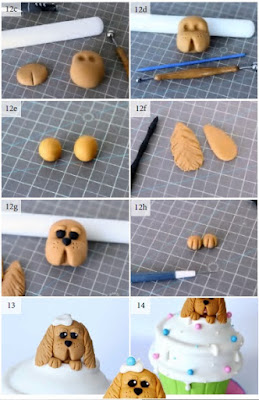
It’s time to make your puppy! Add a small amount of brown gel paste to white fondant, roll into a ball and gently press with your finger to form the top of your puppy’s forehead.


Steps 12c & d.
Use a ball tool to create an opening for eyes. To make a mouth, start with a small ball then flatten into an oval shape with your hands. Use a craft knife to make a cut on the bottom half of the oval, stopping when you reach the centre. Attach the mouth piece with water just below the eye opening. Use a modelling stick to create whisker marks just below the eye openings. To soften the cut you made with the craft knife, gently rub the modelling stick against it

Steps 12e & f.
To make your puppies ears, roll two small balls, flatten and stretch. Use a modelling stick to add texture

Steps 12g & h.
Roll three small balls of black fondant to use as eyes and a nose, then attach with water. Add a small piece of puppy coloured fondant above the eyes to create eyebrows and use a modelling stick to add texture. To make your puppy’s paws, roll two small balls from fondant and use your craft knife to add two lines to each ball.


Step 13.
Use water to attach your puppy’s head to the top of your cupcake. If you would like your puppy positioned higher, you can add a small ball of fondant under his head. Add a skewer stick for more stability if needed. Attach the paws in front of your puppy’s head, just below the mouth. Add a little water to the side to attach your puppy’s ears (because the ears are long, I prefer to add them after the head has been placed). Finally, add an icing drip to the top of your puppy’s head by adding a small piece of white fondant

Steps 14.
Decorate the top of your cupcake by attaching sixlets and dragees with royal icing.

Art Deco Cupcakes Tutorial By Gaynor Clark, Truly Madly Sweetly Cupcakes

Like many cake decorators, Gaynor kind of fell into this work, although she had made some cakes for her children’s birthdays over the years. She decided to make some baby-face cupcakes for her eldest daughter’s baby shower four years ago and booked onto a beginners cupcake class. Gaynor had such fun making them, went on and practiced making more and more! Cupcakes are really her ‘thing’. She now teaches cupcake decorating on a one-to-one basis, and makes food-safe silicone moulds

Equipment Required

• Black sugarpaste
• Gum paste (or Tylo treated sugarpaste) in Black, Grey, Autumn Leaf and White
• Tylo
• Edible glue
• Cornflour
• Rolling pin
• Pastry cutters in 68mm and 78mm
• Foam drying domes
• Embossing mats by TMSC:
Ribbed/Grooves and Decadence
• Selection of Jewelled Silicone Moulds by TMSC
• Gatsby Collection Stencils by TMSC
• Rolkem Edible Dusts in Super Gold and Silver
• Lemon extract
• Trex or white vegetable fat
• Flat paintbrush, for stencilling, and smaller paintbrush, for painting
• 2mm or 3mm gold dragees
• Pastry wheel or craft knife
• Cake smoother


If you have time to allow these toppers to dry overnight, there is no need to treat the sugarpaste. For speedier drying, you can add ⅛-¼ teaspoon of Tylo/ CMC to the sugarpaste.

Step 1.
Make up your jewel embellishments using treated sugarpaste or gum paste in black, white, autumn leaf and grey. Paint them using Rolkem Super Gold and Silver edible dusts and lemon extract.

Embellished Domed Toppers
Step 2.
Roll out black sugarpaste to approximately 3mm on a cornflour dusted work board and cut a 78mm disc with a pastry cutter.

Step 3.
Lift and lay gently over a foam dome to dry. Make a second domed topper in the same way. 


Step 4.
Attach the jewelled fan and large pearl round embellishments to the top of the domes with edible glue or a tiny amount of cooled boiled water

Grooved Square Jewel Topper
Step 5.
Roll out black sugarpaste as before to the same thickness (3mm) and allow to air-dry for a couple of minutes.

Step 6.
Place the Ribbed/Groove mat pattern side down on the sugarpaste and starting from the centre of the circle (ensuring the grooves are vertical), use a rolling pin to press the mat into the sugarpaste. Roll back towards you and keep the pressure even. Alternatively, you could use a cake smoother.

Step 7.
Remove the mat and cut a disc using a 68mm pastry cutter.

Step 8.
Attach your chosen embellishment (I used the square pearl) in the centre of the disc with edible glue. Use the end of a paintbrush either side of it to make indentations where your dragees will sit. Glue the dragees in place.

Decadence Lace Topper
Step 9.
Roll out black sugarpaste to 3mm thick and allow to dry slightly. Lay the Decadence Mat pattern side down onto the sugarpaste. Using your fingers (or a cake smoother), press down evenly onto the back of the mat.

Steps 10a & b.
Peel off the mat and cut a disc using a 78mm pastry cutter. Shape the sugarpaste over a foam dome to dry. 


Step 11.
Make up a fairly thick paste using lemon extract and Rolkem Super Gold. Using a flat brush held flat against the topper, gently tap or dab onto the design and the raised parts will pick up the colour.

Pearls and Feathers Topper
Step 12.
Roll out black sugarpaste to 3mm thick and allow to dry slightly. Lay the Ribbed/Groove Mat on top, pattern side down. Press down evenly using your fingers or a cake smoother. Remove the mat and cut a disc of 68mm with a pastry cutter.

Step 13.
Glue on the three feathers and the pearl cluster embellishment and allow to dry.

Stencilled Art Deco Toppers
Step 14.
Roll out black sugarpaste to 3mm thick and lay your chosen stencil on top. Roll across with the pin, just enough so that the sugarpaste is slightly proud of the stencil. 


Using a finger, and without removing the stencil, smear across the whole topper with a very fine layer of Trex or white vegetable fat.

Step 15.
Still without removing the stencil, use a flat brush to apply some dry Rolkem Edible Dust to the raised parts by tapping or dabbing gently with the flat side of the brush. Don’t overload your brush as to eliminate stray dust settling on the wrong sections of your stencil.

Steps 16a & b.
Once all the exposed parts are covered, very slowly peel back the stencil. Cut a disc with a 68mm pastry cutter and allow to dry.

Repeat with the other two stencil designs using your choice of Gold and/or Silver Rolkem Edible Dusts.

Draped Jewelled Topper
Step 18.
Roll out black sugarpaste to approximately 2cm thick and cut with a 78mm pastry cutter. Lay this disc over a foam dome to dry as in Steps 2 and 3. Roll out black sugarpaste to approximately 2mm thick and cut an approximate 10cm square. Using a craft knife or pastry wheel, cut three or four elongated triangles from this square. 


Steps 19a & b.
Starting at one side and from the pointed end, lay the triangles on top of the domed topper as shown in the photo, overlapping very slightly. Smooth the exposed edge with your finger to soften it. Don’t worry about the overhang of sugarpaste at the edge of the dome, this can be cut off with the craft knife when it has dried a little.

Step 20.
Once you’re happy with your ‘folds’ or swags, use edible glue to add the jewel embellishment 


Apple & Pecan Maple Muffins Cake Recipes

Apple & Pecan Maple Muffins
I always say muffins should have substance – after all, they are muffins, not cake! Dense with apple, sweet with spice, topped with pecans and glazed with maple syrup, these muffins are a favourite of mine.

Preparation time: 20 minutes (+ 5 minutes standing time)
Baking time: 20–25 minutes

150g (5½oz/1 cup) plain (all-purpose) flour
150g (5½oz/1 cup) wholemeal plain (allpurpose) flour
1 tbsp baking powder
2 tsp ground cinnamon
150g (5½oz/¾ cup, lightly packed) brown sugar
2 sweet eating apples (about 180g/6oz each), such as golden delicious, pink lady or royal gala, peeled and cut into 1.5cm (5/8in) pieces 185ml (6floz/1/3 cup) buttermilk 80ml (2½fl oz/1/3 cup) light olive oil or sunflower oil
2 eggs, at room temperature
1½ tsp natural vanilla extract or essence
75g (2½oz/¾ cup) pecans, coarsely chopped
60ml (2fl oz/¼ cup) pure maple syrup, plus extra to serve (optional)

1. Preheat the oven to 190°C/375°F or 170°C/325°F Fan. Line a 12-hole 80ml (2½fl oz/ 1/3 cup) capacity muffin tin with paper cases.

2. Sift together the flours, baking powder and cinnamon into a large bowl, returning any husks left in the sieve to the bowl. Stir in the sugar and apple and make a well in the centre.

3. Use a fork to whisk together the buttermilk, olive oil, eggs and vanilla in a bowl. Add to the flour mixture and use a spatula or large metal spoon to fold together until just combined. (Don’t overmix – the batter should still be a little lumpy).

4. Spoon the mixture into the paper cases, dividing evenly. Scatter over the pecans and then drizzle with the maple syrup.

5. Bake in the preheated oven for 20-25 minutes or until the muffins are golden and a skewer inserted in the centre comes out clean. Leave to cool in the tin for 5 minutes, then transfer to a wire rack. Serve warm or at room temperature, drizzled with extra maple syrup, if desired.

Baker’s tips
• If you don’t have any buttermilk in the fridge you can replace it with 170ml (5½fl oz/2/3 cup) full-cream (whole) milk mixed with 2 teaspoons lemon juice.
• These muffins are best eaten the day they are baked, however they freeze well, too – wrap individually in plastic wrap and then seal in an airtight container or freezer bag. Freeze for up to 3 months. Thaw at room temperature.

White Chocolate Butterfly Cakes Recipes

White Chocolate Butterfly
Makes 12

Preparation time: 20 minutes (+ cooling time) Baking time: 25-30 minutes

Melted butter, to grease (optional)
200g (7oz) good-quality white chocolate, chopped
150g (5½oz) unsalted butter, cubed
185ml (6fl oz/¾ cup) water
220g (7¾oz/1 cup) caster (superfine) sugar
2 eggs, at room temperature, lightly whisked
1½ tsp natural vanilla extract or essence
225g (8oz/1½ cups) plain (all-purpose) flour
50g (1¾oz/½ cup) almond meal
1½ tsp baking powder
125ml (4fl oz/½ cup) thick (double) cream
165g (5¾oz/½ cup) raspberry or blackberry jam
Icing (confectioners’) sugar, to dust

1. Heat the oven to 180°C/350°F or 160°C/315°F Fan. Grease a 12-hole 80ml (2½fl oz/ 1/3 cup) capacity muffin tray with melted butter or line with paper cases. 2. Put the chocolate, butter and water in a medium saucepan and stir over medium heat until the chocolate and butter have melted and the mixture is smooth. Remove from the heat and set aside until cooled at room temperature.

3. Add the sugar, eggs and vanilla to the chocolate mixture and use a balloon whisk to stir until well combined

4. In a medium bowl, use a clean whisk or fork to whisk together the flour, almond meal and baking powder, combining the ingredients evenly and breaking up any lumps of almond meal. Add to the chocolate mixture and stir with the whisk until just combined.

5. Divide the mixture evenly among the muffin holes and lightly tap the tin on the bench top to remove any large air bubbles. Bake in the preheated oven for 25-30 minutes or until a skewer inserted in the centre of the cake comes out clean. Leave the cakes to stand in the tin for 5 minutes before turning out onto a wire rack to cool completely.

6. When cool, cut a shallow cone-shaped piece out of the top of the cake, leaving about 1cm (½in) border. Cut the piece of a cake in half. Spoon a little cream and then some jam into the hole to fill. Arrange the two pieces of cake in the jam to form wings. Repeat with the remaining cakes, cream and jam. Dust with icing sugar to serve.

Baker’s tips
• The unfilled cakes will keep in an airtight container at room temperature for up to 2 days. Alternatively, they will freeze well sealed in a freezer bag or airtight container for up to 1 month. Thaw at room temperature. • These cakes are best eaten the day they are filled.

Gluten-free Baby Passionfruit Cakes with Raspberry Icing

Cakes with Raspberry Icing
Makes 12

Melted butter, to grease
100g (3½oz/1 cup) almond meal
95g (3¼oz/½ cup) instant polenta
2 tsp gluten-free baking powder
125g (4½oz) unsalted butter, at room temperature, cubed
165g (5¾oz/¾ cup) caster (superfine) sugar
90g (3¼oz/1/3 cup) passionfruit pulp (about
4 medium passionfruit)
2 eggs, at room temperature Raspberry icing
30g (1oz) fresh or frozen raspberries
125g (4½oz/1 cup) pure icing (confectioners’) sugar, sifted
1½ teaspoons water

1. Preheat the oven to 180°C/350°F or 160°C/315°F Fan. Brush a 12-hole 80ml (2½fl oz/ 1/3 cup) capacity muffin tin with melted butter to grease.

2. Combine the almond meal, polenta, baking powder, butter, sugar, passionfruit pulp and eggs in a large bowl. Use an electric mixer to beat on low speed until combined. Scrape down the side of the bowl and then beat on high speed for 3 minutes or until the mixture is well combined and very pale in colour. Spoon the mixture into the prepared muffin holes, dividing evenly.

3. Bake in the preheated oven for 20–25 minutes or until the cakes are golden and a skewer inserted in the centre comes out clean. Remove from the oven and leave to stand in the tin for 5 minutes before turning out onto a wire rack, bottom sides up, to cool. This will take about 30 minutes.

4. Meanwhile, to make the raspberry icing, place the raspberries in a small saucepan and sprinkle with 2 tablespoons of the icing sugar. Heat over low heat, stirring occasionally, for 2 minutes or until the raspberries have broken down. Pass the raspberry mixture through a sieve, pressing with the back of a spoon to extract as much juice as possible. Discard any seeds. Stir the raspberry syrup with the water into the remaining icing sugar until smooth and well combined to make a thick, pourable icing.

5. Spoon 1 teaspoon of the raspberry icing on top of each cake, spreading if necessary and allowing it to run down the sides. Set aside for 30 minutes or until the icing sets.

Baker’s tip These cakes will keep in an airtight container at room temperature for up to 2 days.