
Based in Alberta, Canada, Lori made her
first cake five years ago. She is self-taught
in that she has never attended a class,
but has learned from some amazing cake
designers through social media. Lori built
a licensed kitchen in the basement of
her home in 2012, but as her husband
is a Royal Canadian Mounted Police
Officer, her family move every 3-5
years. In October 2015, Lori’s family
was transferred, so she has taken time
away from the busy business to focus on
helping their two children adjust to the
move. She continues to make cakes and
other sweet treats to celebrate birthdays
and special events with the people who
are closest to her, and plans for a new
kitchen have started! Lori loves sculpting
characters and cakes with texture
Equipment Required
• 2 - 2”x6” cakes
• 1 - 6” half sphere cake
• Buttercream
• Fondant
• Royal icing
• Dragees
• Sixlets
• 8” round cake drum
• 4” cake card
• 6” cake card
• Palette knife
• Bench scraper
• Serrated knife
• Rolling pin
Fondant smoother
• Craft knife
• Ruler
• Modelling stick
• Bubble tea straws
• Scissors
• Ball tool
• Small paintbrush
• Gel paste food colours:
Brown, Lemon Yellow, Soft
Pink and Leaf Green
Step 1.
Cover an 8” cake drum with pink fondant. Use a
smoother to smooth the fondant and a craft knife to cut
excess fondant from the edge of the cake drum. I like to
add ribbon around the edge after my cake is complete.
Step 2.
Cut both 2”x6” round cakes into 1” layers. Fill and stack
three layers and set aside the remaining layer
Step 3.
Place a 4” cake card on top of your filled and stacked
cake. Use a serrated knife to carve your cake at a
downward angle, starting from the edge of the 4” cake
card and finishing at the edge of your 6” bottom layer.
Be sure to leave the bottom layer at 6”. I like to chill my
cakes for a few minutes after carving.

Step 4.
Use a palette knife to cover your chilled cake with
buttercream. Once you have covered your cake, use a
bench scraper to smooth the buttercream and create
clean edges.
Steps 5a-c.
Roll out green fondant and cover your cake. I added
a small amount of yellow gel paste to the green to
achieve this colour. Once you have your cake covered,
smooth it out with a fondant smoother and use a craft
knife to cut away excess fondant
Steps 6a & b.
While your fondant is still soft, use a ruler to measure
vertical lines that are 1” apart. Gently press a modelling
stick into your fondant using the length of the ruler as
a guide.
Steps 7a & b.
Flip your cake so that it is resting on the tapered 4” end.
Place your cake in the centre of your 8” covered cake
drum. Your cupcake bottom is complete. Insert three
bubble tea straws into your cake, cutting them with
scissors or a craft knife. The straws will support the top
of your cupcake
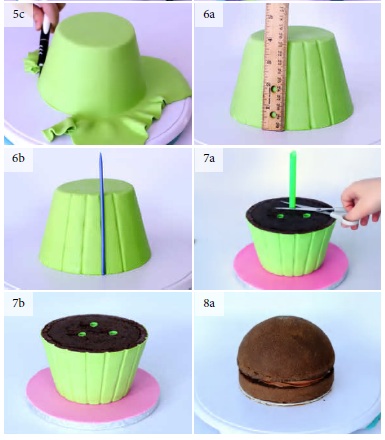
Steps 8a-c.
Fill and stack the remaining 1”x6” round cake and half
cake sphere. Place it on the 6” round cake card. Use
a palette knife to cover your cake with buttercream.
Cover with a thin layer of white fondant, then place on
top of your cupcake bottom
Steps 9a-c.
Role a 36” long rope from white fondant. Use a small
paintbrush to apply a thin layer of water to the top of
the cupcake. The water will hold the fondant rope in
place. Be careful not to use too much or the rope will
slide rather than stay in place. Swirl your fondant rope
around the top of the cake. Press gently to be sure it
stays in place.

Steps 10a & b.
Roll a layer of white fondant to cover the top of your
cupcake. Use your fingers to gently smooth your
fondant around the rope.
Steps 11a & b.
To create the dripping icing, roll small fondant balls and
use your fingers to roll each ball into a teardrop shape.
Attach with water

Steps 12a & b.
It’s time to make your puppy! Add a small amount of
brown gel paste to white fondant, roll into a ball and
gently press with your finger to form the top of your
puppy’s forehead.
Steps 12c & d.
Use a ball tool to create an opening for eyes. To make
a mouth, start with a small ball then flatten into an
oval shape with your hands. Use a craft knife to make a
cut on the bottom half of the oval, stopping when you
reach the centre. Attach the mouth piece with water
just below the eye opening. Use a modelling stick to
create whisker marks just below the eye openings. To
soften the cut you made with the craft knife, gently rub
the modelling stick against it
Steps 12e & f.
To make your puppies ears, roll two small balls, flatten
and stretch. Use a modelling stick to add texture
Steps 12g & h.
Roll three small balls of black fondant to use as eyes
and a nose, then attach with water. Add a small piece
of puppy coloured fondant above the eyes to create
eyebrows and use a modelling stick to add texture.
To make your puppy’s paws, roll two small balls from
fondant and use your craft knife to add two lines to
each ball.

Step 13.
Use water to attach your puppy’s head to the top of
your cupcake. If you would like your puppy positioned
higher, you can add a small ball of fondant under his
head. Add a skewer stick for more stability if needed.
Attach the paws in front of your puppy’s head, just
below the mouth. Add a little water to the side to
attach your puppy’s ears (because the ears are long,
I prefer to add them after the head has been placed).
Finally, add an icing drip to the top of your puppy’s
head by adding a small piece of white fondant
Steps 14.
Decorate the top of your cupcake by attaching sixlets
and dragees with royal icing.
No comments:
Post a Comment